Wednesday, August 26, 2020

How To Extract Actual Addresses From Hyperlinks In Excel?


How To Extract Actual Addresses From Hyperlinks In Excel?

Supposing you have a range of cells which contain hyperlinks, and now you need to see the real destination of the hyperlinks and extract them from the hyperlinks as following screenshot shown. Are there any easy ways to solve this problem quickly? This article will guide you to extract actual addresses from multiple hyperlinks.


arrow blue right bubble Extract Actual Addresses From Hyperlinks With Edit Hyperlink Feature

Here, the Edit Hyperlink function can help you extract the underlying URL for each of these hyperlinks and place that actual address into a different cell. You can do as this:

1. Select the cell with hyperlink and right-click, from the context menu, choose Edit Hyperlink, see screenshot:

2. And an Edit Hyperlink dialog box will be appeared, select and copy (Ctrl+C) the entire URL from the Address field of the dialog box.

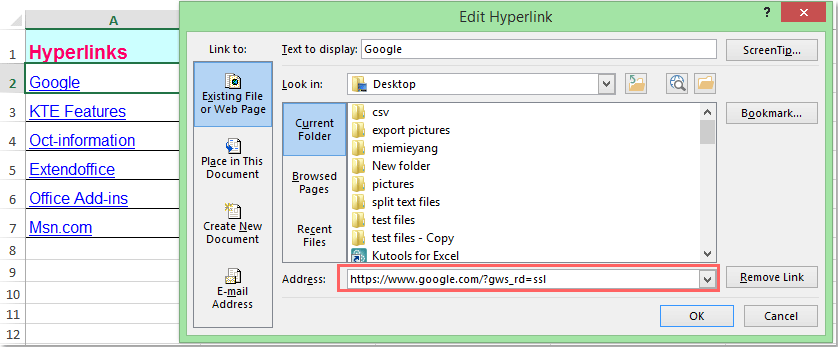
3. Then close the dialog box and paste the actual address into any cell you want.

Note:With this method, you can extract only one hyperlink address each time, but if you have multiple hyperlinks need to be extracted, you need to apply this function repeatedly.


arrow blue right bubble Extract Actual Addresses From Hyperlinks With VBA Code

For a lot of hyperlinks, the above method will be tedious and time consuming, so the following VBA code can help you quickly extract multiple addresses from the hyperlinks at once.

1. Hold down the ALT + F11 keys to open the Microsoft Visual Basic for Applications window.

2. Click Insert > Module, and paste the following code in the Module Window.

1
2
3
4
5
6
7
8
9
10
11
12
13
14
Sub Extracthyperlinks()
'Updateby Extendoffice
Dim Rng As Range
Dim WorkRng As Range
On Error Resume Next
xTitleId = "KutoolsforExcel"
Set WorkRng = Application.Selection
Set WorkRng = Application.InputBox("Range", xTitleId, WorkRng.Address, Type:=8)
For Each Rng In WorkRng
    If Rng.Hyperlinks.Count > 0 Then
        Rng.Value = Rng.Hyperlinks.Item(1).Address
    End If
Next
End Sub

3. Then press F5 key to run the code, and a dialog pops out for you to select the hyperlinks that you want to extract the real addresses, see screenshot:

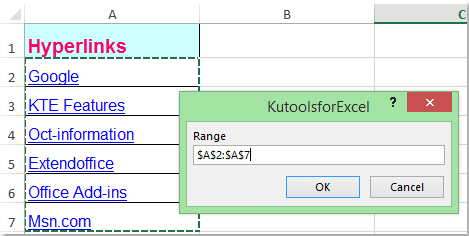
4. Then click OK, and the selected cell contents have been converted to the real hyperlink addresses in the original range. See screenshots:


arrow blue right bubble Extract Actual Addresses From Hyperlinks With User Definde Function

The following User Defined Function also can extract the actual URl from the hyperlinks.

1. Hold down the ALT + F11 keys to open the Microsoft Visual Basic for Applications window.

2. Click Insert > Module, and paste the following code in the Module Window.

1
2
3
4
Function GetURL(pWorkRng As Range) As String
'Updateby Extendoffice
    GetURL = pWorkRng.Hyperlinks(1).Address
End Function

3. Save the code and close the window, select a blank cell to type this formula =GetURL(A2) (A2 is the cell that the hyperlink in), and press Enter button. You can see the real hyperlink address is extracted.


arrow blue right bubble Extract Actual Addresses From Hyperlinks With Kutools For Excel Quickly And Easily

Here is a handy tool, called Kutools for Excel, with its Convert Hyperlinks feature, you can quickly deal with the following operations:

  • Extract actual addresses from hyperlinks;
  • Convert url text to clickable hyperlinks.
Kutools for Excel with more than 300 handy Excel add-ins, free to try with no limitation in 30 days

If you have installed Kutools for Excel, please do as follows:

1. Select the range which contains the hyperlinks need extracting.
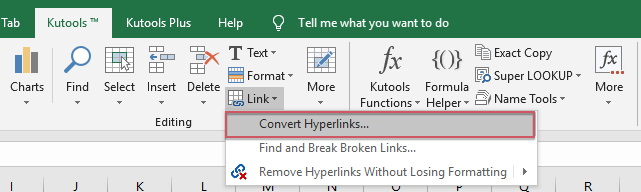
2. Click Kutools > Link Convert Hyperlinks, see screenshot:

3. In the Convert Hyperlinks dialog box, select Hyperlinks addresses replace cell contents option, and click doc-button1button from Result range to specify a cell to put the result.

4. And then click OK, the actual addresses have been extracted from the hyperlinks. See screenshot:

Note: If you want to put the actual addresses to the original range, please check Convert source range.

Click Convert Hyperlinks to know more about this feature.

Download and free trial Kutools for Excel Now !


arrow blue right bubble Demo: Extract Actual Addresses From Hyperlinks With Kutools For Excel

Kutools for Excel: with more than 300 handy Excel add-ins, free to try with no limitation in 30 days. Download and free trial Now!

Related article:

How to convert url text to clickable hyperlink in Excel?


The Best Office Productivity Tools

Kutools For Excel Solves Most Of Your Problems, And Increases Your Productivity By 80%

  • Reuse: Quickly insert complex formulas, charts and anything that you have used before; Encrypt Cells with password; Create Mailing List and send emails...
  • Super Formula Bar (easily edit multiple lines of text and formula); Reading Layout (easily read and edit large numbers of cells); Paste to Filtered Range...
  • Merge Cells/Rows/Columns without losing Data; Split Cells Content; Combine Duplicate Rows/Columns... Prevent Duplicate Cells; Compare Ranges...
  • Select Duplicate or Unique Rows; Select Blank Rows (all cells are empty); Super Find and Fuzzy Find in Many Workbooks; Random Select...
  • Exact Copy Multiple Cells without changing formula reference; Auto Create References to Multiple Sheets; Insert Bullets, Check Boxes and more...
  • Extract Text, Add Text, Remove by Position, Remove Space; Create and Print Paging Subtotals; Convert Between Cells Content and Comments...
  • Super Filter (save and apply filter schemes to other sheets); Advanced Sort by month/week/day, frequency and more; Special Filter by bold, italic...
  • Combine Workbooks and WorkSheets; Merge Tables based on key columns; Split Data into Multiple SheetsBatch Convert xls, xlsx and PDF...
  • More than 300 powerful features. Supports Office/Excel 2007-2019 and 365. Supports all languages. Easy deploying in your enterprise or organization. Full features 30-day free trial. 60-day money back guarantee.
kte tab 201905

Office Tab Brings Tabbed Interface To Office, And Make Your Work Much Easier

  • Enable tabbed editing and reading in Word, Excel, PowerPoint, Publisher, Access, Visio and Project.
  • Open and create multiple documents in new tabs of the same window, rather than in new windows.
  • Increases your productivity by 50%, and reduces hundreds of mouse clicks for you every day!
officetab bottom

Wednesday, July 8, 2020

The Powershell script to get last 30days deleted files report from all site collections and web applications in SharePoint 2013

This script pulls the deleted files report from all site collections in a Farm.


Add-PSSnapin Microsoft.SharePoint.PowerShell

# Creating folder with Todays date
$startTime = (Get-Date)

$date = Get-Date
$date = $date.ToString("yyyy-MM-dd-hh_mm_ss")

$Folder = New-Item -ItemType directory -Path "C:\Deletedfiles_reports.\$date"

# --------------------------------------------------------------------#

$webapps = Get-SPWebApplication

foreach ($webapp in $webapps){ 
 
$webappurl = $webapp.URL; 
$webappname = $webapp.DisplayName 
$sites=get-spsite -limit all -WebApplication $webappurl
 
foreach ($site in $sites) 

Write-Host "Site URL:" $site.url 
Write-Host $site.RootWeb.Title

# $Path = 'C:\Deletedfiles_reports\' + $site.RootWeb.Title + '.csv'

$Folderpath = $folder.ToString()

$Path = $Folderpath + '\' + $webapp.Name + '-' + $site.RootWeb.Title + '.csv'

$url= $site.url

$deleteFrom = -30

$report = $Path

New-Item $report -type file -Force | Out-Null

Add-Content $report "Name, Title, Deleted by, Deleted date, Path, File Guid"

$dateNow = Get-Date

$dateDiff = $dateNow.AddDays($deleteFrom)

$site1 = Get-SPsite $url

$site.Recyclebin | where { $_.deleteddate -ge $dateDiff} | foreach{ Add-Content $report "$($_.LeafName),$($_.Title),$($_.deletedbyname),$($_.deleteddate),$($_.Dirname),$($_.Id)"

 
}
}
    }

    $endTime = (Get-Date)

    #Send Email Start
function sendmail()
{
$ComputerName = $env:computername
  $smtpServer = (get-spwebapplication)[0] | %{$_.outboundmailserviceinstance.server} 
[string]$smtpClientIp=$smtpServer.get_Address()
$EmailFrom = "DoNotReply.SPPPD@xyz.com"
$EmailTo = "sathyambabu.savanam@xyz.com"
$EmailCc="Arunakumar.G@xyz.com"
$EmailBody = "Hi SharePoint Team, <br/><br/> The deleted files report from the PPD farm has been completed successfully  on " + $ComputerName + " in "+$Folderpath+"\"+ " folder.<br/><br/>" + "Start Time:" + $startTime + "  and End time:" + $endTime
$EmailBody += $OutputEamilHtml
$EmailBody += "<br/><br/>" + "Thanks," + "<br/>ECM SharePoint Team"
$EmailSubject = "Deleted files report from PPD farm completed successfully on Server : " + $ComputerName + "."
$SMTPServer = $smtpClientIp
  Send-MailMessage -From $EmailFrom -To $EmailTo -Cc $EmailCc -Subject $EmailSubject -body $EmailBody -SmtpServer "mailhost.cenovus.com" -Priority High -BodyAsHtml
"Emailed $subject on $dt to $EmailTo" | out-file -filepath "outfile.log" -append
 }

sendmail


Saturday, June 6, 2020

How to get modern Team & Communication sites using PnP Powershell

PnP Powershell commands are one of the powerful player in accessing and managing the SharePoint Online / On-Premise sites from remote machinePnP team keep on updating the commands based on the updating feature released on SharePoint Online & On-premise tenants.
For now a days, we are keep on talking about modern  team and communication sites. Here I’m going to list out the commands to get the details on the modern sites created based on the team and communication templates.
Visit SharePoint/PnPPowerShell from Github to know more about PnP Powershell and you can view all the powershell cmdlets from PnPPowershell Documentation
In this post, I’m giving you an example based on SharePoint online. So I have installed the online module called “SharePointPnPPowerShellOnline”.
Before accessing the SharePoint objects, open the powershell command prompt and ensure latest powershell module installed on your machine. Use the below command to update to the latest SharePointPnPPowerShellOnline module,
PS:> Update-Module SharePointPnPPowerShell*
Use the below command references to connect the SharePoint online site
PS:> $credential = Get-credential

PS:> Connect-PnPOnline -Url https://ktskumar.sharepoint.com -Credential $credential

Once we got connected to the SharePoint site, use the below commands to get the list of available sites in SharePoint tenant.

Get all SharePoint sites except Modern sites

PS:> Get-PnPTenantSite
The above PnP powershell command retrieves and  shows the available SharePoint classic sites in the Tenant. It doesn’t returns the sites created with modern templates. We may expect this command to show classic and modern sites in coming days.

Get all SharePoint sites including modern and onedrive sites

PS:> Get-PnPTenantSite - IncludeOneDriveSites
The above PnP command retrieves and shows the classic, modern and OneDrive for Buisness sites from the Tenant.

Get all Modern Team SharePoint sites

PS:> Get-PnPTenantSite -WebTemplate GROUP#0
The above PnP powershell command gets and lists the sites created based on Modern team site template from the SharePoint tenant. And each site is associated with a Office 365 group.

Get all Modern Communication SharePoint sites

PS:> Get-PnPTenantSite -WebTemplate SITEPAGEPUBLISHING#0
The above PnP powershell command lists the communication sites from the SharePoint tenant.

The SharePoint online site collection information are stored in the hidden list called “DO_NOT_DELETE_SPLIST_TENANTADMIN_AGGREGATED_SITECOLLECTIONS” under SharePoint Tenant Administration site and this list has the below columns

AllowGuestUserSignIn
PrimaryAdmin
SMTotalSize
Classification
ShareByEmailEnabled
StorageQuota
ExternalSharing
ShareByLinkEnabled
StorageQuota.
FileViewedOrEdited
SiteId
StorageUsed
IsGroupConnected
SiteOwnerEmail
StorageUsed.
LastActivityOn
SiteOwnerName
TemplateTitle
LastActivityOn.FriendlyDisplay
SiteSecondaryOwnerEmail
TimeCreated
NumOfFiles
SiteSecondaryOwnerName
TimeDeleted
PageViews
SiteUrl
Title
List URL: https://<tenant>-admin.sharepoint.com/Lists/DO_NOT_DELETE_SPLIST_TENANTADMIN_AGGREGATED_SITECO
By using the this list, we can also categorize and retrieve the modern site collections. Use the below command references to connect the SharePoint Tenant Administration online site
PS:> $credential = Get-credential
PS:> Connect-PnPOnline -Url https://ktskumar-admin.sharepoint.com -Credential $credential

How To Hide List Column(Read only columns like Check-box, Calculated) in SharePoint 2010/13


  1. Open SharePoint Designer.
  2. Open the website that contains your list with the calculated column.
  3. Click on "Lists and Libraries" in the left column (under Site Objects).
  4. On the right, click on the list that contains your calculated column.
  5. Under "Content Types", click on the content type where you want to hide the calculated column
  6. In the content type screen, click "Edit content type columns"
  7. In the column "Property", try clicking a few times on the "Optional" value until it changes into a dropdown list.
  8. Select "Hidden" from the dropdown list and click on push changes to sites and lists on ribbon.
  9. Finally Save your changes.

Friday, May 29, 2020

THE EXPECTED VERSION OF THE PRODUCT WAS NOT FOUND ON THE SYSTEM, WHEN INSTALL CUMULATIVE UPDATES IN SHAREPOINT


Environment:
SharePoint Server 2013 On-Premises

Case:
When I tried to update CU in SharePoint Server 2013, the installation says with pop-up messages:
"The expected version of the product was not found on the system"
Look, I already installed SharePoint Server SP1 in my environment. So, what’s wrong?
See below solution.

Solutions:
"PACKAGE.BYPASS.DETECTION.CHECK=1"
Wait! What is that code for? Just add in your last cmdlets.
For example, I want to update CU August 2018:
.\ ubersrv2013-kb4032247-fullfile-x64-glb.exe PACKAGE.BYPASS.DETECTION.CHECK=1
patching - afahru.com